Showing posts with label sewing. Show all posts

4.29.2010

handmade days - melissa dress from burda

melissa dress from burda style
i'd really love to learn how to sew knits - i've toyed with the notion more recently. it just seems like a perfect option for refashioning thrift store finds or creating simple summer dresses. from this one from burda style seems like a nice starter.

9.26.2009

recent sewing


i mentioned previously that i'd been trying to get a bit further into sewing - especially with my uncommitted fridays. in august, i had someone come in to walk me through sewing with a pattern. her name was kristen & i found her via craigslist; she lived in my neighborhood & only charges $100 for about 5 hours of assistance & tutoring. she forced me to take my time & pay attention to the details of the pattern, as well as explain parts/instructions i didn't understand. we made a pair of black flowy pants (aka new look 6896) & i can say i know how to add an invisible zipper, pleats, pockets, darts & a waistband to projects. i'm not sure this means i'll change my ways & only sew from patterns, but i'm sure i'll make a few more pairs with this pattern to get used to it before adding these things to my own projects.


the next project on my list (for weeks now) was to refashion a men's shirt. plaid seems to be all over this fall & i new it was time to get it done. this one was kind of a disaster, but i'm fairly happy with the results. i started to follow this tutorial, but couldn't handle the puckered sleeves. here's how i ended up handling it:
  1. detach sleeves using a seam ripper.
  2. use a shirt that fits you to lay over the men's shirt - use as a pattern & cut shirt appropriately.
  3. Sew the sides of the shirt until 6" from the bottom (if you choose to do a split on the sides).
  4. if straight along the base of the shirt cut into the edges to create rounded sides.
  5. iron hems along the sides & the bottom of the shirt, sew using a straight stitch.
  6. reinforce side seam where it splits.
  7. turn sleeves inside out & sew a seam creating a more fitted arm.
  8. pin right sides of each sleeve to the armhole in your shirt. mine happened to be the same circumference (dumb luck?!)
  9. using a straight stitch, attach sleeves to body.
  10. for a final touch, i added to 2.5" darts to the mid back for a better fit.
it all seemed sort of haphazard & i'd probably take a bit more time on the next one, but it's the perfect weekender shirt or might look cute tucked into a wool skirt.

8.19.2009

still dottie tutorials published


i got a mystery package today; those are the best kind. i hurried upstairs, opened it up & find 3 copies of sewing: 2010 day-to-day calendar from accord publishing (also the proud publisher of cake wrecks). check out 5.3, 11.4 & 12.30 - that'd be me!!!! i'm honored to be selected, thanks megan!

8.11.2009

fashion blitz - a sewing project


doesn't this heidi dress from burdastyle look like the perfect transition dress - summer to fall baby! the pattern is just $4 & comes in sizes 34-46. i'm ordering one as we speak.

1.19.2009

singer reference guide


this lovely book was tucked into one of my favorite christmas packages this year. the beautiful gift included the singer reference guide, another how to book, a massive button collection & a deer skin roll filled with knitting needles (more on that later) - all from my great grandmother. it was such a perfect gift - i cried while thumbing through everything, it meant so much.

i chose to share this because i love the illustrations & the black plus one color printing. it's yum yum.

10.08.2008

make this - 10 minute top


i'll make this top in the next couple of days. thanks to stitch lounge | sew urban for the tutorial.

via craft:

9.26.2008

honeycomb smocking


this tutorial by tumbling blocks has been on craft: & whipup but i have to feature it. it's gorgeous & i want something smocked. hmmmm.

9.19.2008

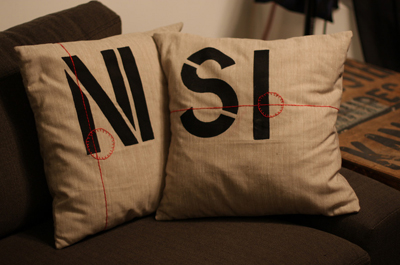
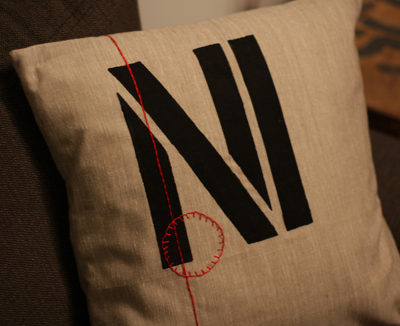
nisi throw pillow covers


i got these done on monday night, i think they turned out playa. we wanted to do a play on letters & rearrange them to spell different things. i wanted them to be masculine with a touch of ann & it was accomplished. how'd i do it?

first, create throw pillow covers using this tutorial. before sewing you'll want to follow the steps below.

what you need:
fabric paint
sponge brush
stencils
masking tape
typing paper
iron
embroidery floss
needle

instructions:
1. using the masking tape, place stencil in desired position
2. with the sponge brush, paint letters, be careful to hold the stencil down tight so paint will not seep under it.
3. let dry for 2-3 hours & set with warm iron. place typing paper over the dry lettering, iron over paper for 3-5 minutes.
4. use embroidery floss & needle to create patterns of your liking with a contrasting color. i've been working through the new crewel, a fantastic book on crewel embroidery.

after all of this, continue following the steps from the previously mentioned tutorial. i'm thinking that i may do some for my etsy store, what do you think?

5.26.2008

makeup brush carrier


i've discovered the magic of using makeup brushes. this means that i needed something to store & carry them all in; i bike to work most days, which means my makeup comes with me. i decided to create a simple carrier & post a tutorial - it seems like it's been a while.

what you need:
1/2 yard of fabric (lightweight)
needle
thread
pins

instructions:
1. cut a 13" x 32" rectangle & 15" x 2" strip of fabric
2. fold rectangle in half with right sides facing in
3. fold edge c up 5.5 inches. place your desired brushes & pin the appropriate gathering for them to fit in section c. With the brushes & pins in place trim edge a. this should create a slight angle that will allow for the extra fabric.
4. unpin & unfold fabric. sew a straight stitch down sides a & b. turn right side out & iron.
5. fold a .5" hem on edge c & sew a straight stitch.
6. bring edge c (now hemmed) up 5.5" toward edge d with the hem facing in.
7. stitch side b - now 10" - with 2 parallel straight stitches
8. sew straight stitches in appropriate intervals for your brushes (1.25 for eye brushes, 2 for blush or larger brushes) reinforce the top & bottom of those stitches.
9. iron strip into thirds & do one straight stitch down the center of the tri-fold (catching both edges)
10. fold edge e over twice toward the exposed edge, stitch.
11. pin unfinished end of strip just below the hem on side a.
12. stitch side a - now 10" - with 2 parallel straight stitches

helpful hints:
1. have your brushes on hand to ensure the right fit

i have posted pics of the entire process along with captions that repeat these instructions. you can also open a larger version of the pattern below by clicking directly on it.

4.20.2008

anda dress


cross it off my list - i made a dress from a pattern. maybe i didn't print it, or pin it to the fabric, maybe i didn't really use it. but i downloaded it, read the instruction & eyeballed it. it's half from the anda pattern by burda. i used a bright purple, mid-weight linen.

a couple of things about my version. i didn't do the drawstring or the casing; i knew i would wear belts instead. i did make a belt with matching fabric & brown buttons. pre-wash your fabric, i never do this - i always regret it. i also cut the back panel too big, so i did a couple of darts in the back.

to see more pics check here. i just posted a year of projects.

4.10.2008

owl plushie


this is my first attempt at making something plushie - felt & stuffed with batting. i love him because he's my first, but i learned a couple lessons along the way & am looking forward to making another.

here is a rough tutorial:

1. i cut out each felt shape based on the vector work that i had previously done (2 of each). i decided to use a blanket stitch & found this great tutorial.
2. the wings were the first pieces i did; originally i thought that it would be cute to have a contrasting color thread (ie white), but decided heavily against it once both were done. i redid them with a matching thread.
3. i moved on to the feet & eyebrows. in an attempt to make the owl stand i used bent earring hoops (the cheap kind found in craft stores) & slid them between two stitches so that the feet had a platform & there would be some wire in the body as well (exposed wire coming upright from the foot).
4. i then did a blanket stitch around the eyes (just for looks, it was only one layer of felt) & attached the googley eyes. that whole piece & the eyebrows got attached to the front half of the body piece.
5. i lightly stuff the wings & sewed them onto the back half of the body piece.
6. now that the amenities were attached (besides the feet), i began the blanket stitched around the body. i did a stitch through the wings that looked similar to the blanket stitch but would let that section be more secure.
7. once there was only an inch or so open, i filled the body with batting & closed it up.
8. last, i inserted the wire from the feet to the base of the owl & stitched the back of the feet one the base of the owl.

i'll do a more detailed pattern later, but for now i'm just happy to have him. thanks to bart for indulging my nerdiness & being part of the owl/birch photoshoot.

UPDATE - click on image for 8.5" x 11" pattern

4.04.2008

burdastyle - to sew


while doing some research for an upcoming project with natalie, we stumbled upon burdastyle (actually natalie did). i've spent some time there lately, mostly looking at it from a format standpoint; burdastyle is a place where users can upload/download sewing patterns, comment & review them & post their own takes a pattern. i've looked past some of the really clear, simple & gorgeous patterns they have available, many for free.

on my 2008 to do list i mentioned sewing a dress with a pattern. maybe that will change, maybe it will be these pants (chris don't throw up) or the skirt pictured above, but of course - it could be this very simple dress (i think i'll add a thick waist band or corset).

3.03.2008

high-waisted, button-front skirt


i saw this skirt by house of spy in lucky magazine a couple of months ago & was determined that i could make it myself. after a few sketches & planning out what my simplified skirt required, i headed to the fabric store, not sure of what i wanted. i stumbled upon some blue/grey stretchy canvas that resembled dickies material. i knew it would work.

i created a rough outline (pattern) based on my earlier sketches, drew it in chalk on the fabric & began cutting. i only cut out the basic shapes, leaving a lot of extra fabric at the top of the pieces because i hadn't figured out how the draw string or waistband was going to work. i was hoping that all of the details would come together after i was able to hold the basic shape to my body (i need a dress form, but think i would be frightened by it). i was happy to find out that they would. the adjustments go like this:

- 2" waistband with a split in the back
- 2.5" hem at bottom of the skirt
- two darts on back of skirt, each 4" from back seam
- 3 buttons down the front of the skirt (i am going to add some hiding snaps too)
- 2 darts on front of skirt, each 2.5" from the button panel
- faux draw string attached 2" from each end on the inside of the skirt, come to the front through buttonholes & tie

more detailed pics