Showing posts with label tutorials. Show all posts

6.17.2010

handmade days - knot this

knotted jewelry on refinery 29
knotted rope can make some pretty sick jewelry. get your tie on here - lots of great video tutorials.

image via refinery 29.

5.20.2010

handmade days - pencil eraser stamps

pencil eraser stamp tutorial from creature comforts

pencil eraser stamp tutorial from creature  comforts

pencil eraser stamp tutorial from creature  comforts
creature comforts
does it again. this pencil eraser stamp tutorial (with free printable) is perfect for a handmade touch to gifts, cards or labels.

4.16.2010

handmade days - braided rag rug

craft passion braided rag rug tutorial
i've always loved rag rugs - they remind me of the cottage at fife lake. it takes me to standing in the kitchen sporting a sopping wet bathing suit, looking for that big ol' bag of chips to take to the beach. they feel like summer under my feet.

craft passion has a great tutorial here. i'm about to run down to value village & pick up some old sheets.

4.08.2010

handmade days - bottle painting & bathroom art

such sweet projects for your upcoming spring weekend.

painted bottles from poppytalk
what a great way to reuse kitchen glass - juice containers, pb and olive jars. thanks to poppy talk for the link.

bathroom art from apartment therapy
more reuse - tp rolls make a killer wall hanging on apartment therapy.

3.25.2010

handmade days - t-shirt yarn

t-shirt yarn spools

i've been eyeing these yummy necklaces for a while, but necklush has taken over the etsy market (this was all over europe last summer & i was happy to see someone going for it here in the states). if you want to make your own - it starts with the t-shirt yarn. go - get crazy - make a necklace from those thrift store tees via craft passion.

image via painting daily.

3.18.2010

handmade days - page-turner art


genius. love. page-turner art tutorial from team diy.

3.11.2010

handmade days - pendant lamps

craftynest hemp pendant lamps

craftynest hemp pendant lamps

see these? they are my weekend project, alongside an ikea trip & dining chair hunting. craftynest has a wonderful tutorial & i'm super pumped to give this (seemingly messy, but easy) tutorial a shot.

2.25.2010

handmade days - stenciled leggings

stenciled legging tutorial from transient expression

yeah, there's a bit of a leggings debate. they aren't pants - i'm aware of that & argued it to my death a year ago. my question now, is how i'm supposed to ignore a trend that allows women to be fashionable in something so close to sweatpants. hell, there were sweatpants on the runway in ny.

until i realize what a silly phase this was, i will embrace it & even adorn the leggings with sweet little stencils.

thanks to transient expression for the idea & tutorial.

2.11.2010

handmade days - playing with paper - essimar

paper hearts by essimer

paper hearts by essimer

paper hearts by essimer

essimar's blog has me convinced that the only way for me to spend the next two days is with brightly colored paper & scissors. her pieces are perfect for valentine's day, maybe b needs an envelope full of paper hearts to know i love him this year. check out her etsy shop & flickr here.

other sweet valentine's project from design*sponge, 100 layer cake, & rachel leonard.

2.05.2010

still dottie diy tutorials

see below for the ultimate collection of still dottie patterns & tutorials!

braided chain necklace tutorial
braided chain necklace

jeweled t-shirt pattern and tutorial

jeweled t-shirt 

paper napkin ring tutorial
paper napkin rings

valentines day hidden message felt heart tutorial and pattern
hidden message felt hearts

holiday garland felt tutorial

holiday garland

fabric flower broach, hair piece and belt tutorial and pattern 
flower cluster - a broach, belt & hair piece

feather and flower headband tutorial
feather & flower headband

makeup brush carrier pattern and tutorial

makeup brush carrier

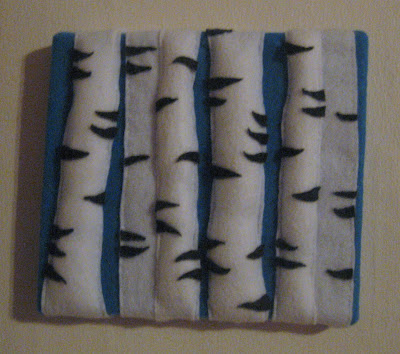
felt wall hanging tutorial 
felt birch wall hanging 

reuse wine cork trivet tutorial

wine cork trivet & board

high waisted button front skirt tutorial

high-waisted, button-front skirt

fabric stitched notecard tutorial
fabric stitched notecards

teapot cozie tutorial and pattern

teapot cozie

ipod cozie knit tutorial

ipod cozie

smock apron free pattern and tutorial

smock apron


embroidered pillow tutorial

embroidered pillows

11.12.2009

handmade days - candy these apples


i want to make some of these delicious treats - it's just that time of year.

10.22.2009

handmade days - braided chain tutorial


while flipping through lucky a couple months back, i stumbled upon this this necklace from guess for $35. it seemed like a reasonable price, but i tore it out anyway - seeing if i could make it happen for myself or find it even cheaper.


then a couple of weeks ago i was looking through etsy and found these fun enamel chains, it seemed that they would make a fun braided necklace like the one i saw in lucky. i still really like the silver & am hoping to make a second or third version out of vintage chains & a more polished one from bulk chain at my local bead shop.

this turned out to be a super simple, 30 minute necklace; one totally worth making. the chains ran me $16 & i had to pick up some beading supplies for the closure (could be done as cheap as $5). with that said, here's how to do it.


what you need
wire cutters
needle nose pliers
7 paper clips
necklace closure
beading wire
15 feet of chain (3 5-feet links, silver, gold, enamel)

instructions

  1. double each 5 foot chain and mark each with a paper clip. make sure that each chain is of varying length.
  2. combine all 3 paper clips with the fourth paper clip.
  3. pair off chains & braid tightly for 7 inches.
  4. straighten a paper clip and run through all 6 chains.
  5. lay the full necklace out on a flat surface, match up each end up the chains. form the chains into an oval, draping into the ideal shape.
  6. keeping the draped section in tact, straighten a paper clip and run through the 6 chains where you'd like to start the second braid.
  7. pair off chains and braid loosely until the end of the chains. i left a chain or two hang, skipping some braids.
  8. finish off the necklace by threading the chains with a final paper clip.
  9. to add a closure i followed directions from an associate at my local bead store, so these might be a little rough.
  10. first i cut about 5 inches of 20 gauge wire. using a pencil i shaped a loop in the center of the 5 inches, pulled the loop open & turned on end into a 90 degree angle. i then threaded the end of the chains, and closed the loop. then using needle nose pliers i wrapped the side bent to a 90 degree angle around the other side 3 times.
  11. forming another hoop, i then threaded in the clasp.
  12. wrap back down once or twice, clip each wire tight. use the needle nose fliers to tighten the wrapped wire.
  13. repeat 10-12 for the other end of the necklace. i added a medium sized glass bead between the loop for added interest.
clearer instructions for finishing the necklace (steps 10-13): witty living, ehow with kathleen wright, and about.com.

click here for process photos. please feel free to email me or leave comments with any questions or suggestions you might have on this tutorial, i always love to hear from you.

10.15.2009

handmade days - jeweled tee tutorial


i've been eyeing the tees at j.crew for weeks now, trying to decide if i can spend $50 on a grey t-shirt. in addition to that, i have the "i could make that" problem; i see something i really like, but seems too expensive & shrug it off saying that if i wanted it i could fashion it for myself. this time, i decided to make it happen. the result is a cozy tee with a little bit of sparkle, perfect for a casual, put together day.

i thought for a while on color scheme & thought that i would get most wear out of something that was a monotone pallette. i considered doing something pink/beige with gold sequins & beading, but ended up using a heather grey tee with grey tule, silver sequins & both silver & white beads. the j.crew tees run between $40 & $50, this project will cost you around $15-20. i chose a tissue tee from h&m, costing around $7.50; my other supplies ran about $8.

after a couple of trials with shape of the design & beading patterns, i have for you a finished product & tutorial to boot.

tips & tricks
  1. try to come up through the tule where you want the outside of your sequin to lay, going back down through the center allows you to secure it's placement.
  2. this embellishment is made up of 7 patches of sequin/beading. i've provided a pattern for the tule to be cut, but feel free to modify it to your liking. add bigger patches, more patches, less patches, etc. each one that i've shown here is open for change.
  3. i'm curious about the care of this shirt. i'll let you know what i find out, but for now i may handwash or machine on delicate. i'd definitley recommend line drying.


what you need
1 t-shirt (preferably tissue or thin with a slim cut)
1/4 yard tule for backing the design
2 yards (a little extra) of strung sequins or 1 small pack
20 gram pack of beads (can use more than one kind)
needle
thread
scissors

instructions
  1. pre wash your tee to make sure that it doesn't shrink much after the project is finished.
  2. unstring 1 yard of your sequins (unstring the rest as needed).
  3. print attached pattern and cut tule according to the instructions.
  4. layer both a pieces underneath the 3 b pieces.
  5. double thread your needle, tying a knot at the end.
  6. coming up from the bottom of your tule at the edge of the b pile, pull the needle taught.
  7. thread one sequin, come back down through the center of the sequin, then the tule.
  8. continue step 6-7 for each sequin, forming a series of circles within each other. finish the sequins off by cutting the thread at the needle & tying the two pieces in multiple knots.
  9. now you'll want to add the beads to the center of each sequin. with a double threaded needle, come up through the center of one sequin.
  10. thread the bead, coming back down again through the center of sequin. this adds a nice texture & secures the placement of the sequin.
  11. continue steps 9-10 for each sequin. finish the beads off by looping the remaining thread through sequin stitching, then cutting the thread at the needle & tying the two pieces in multiple knots.
  12. next, you'll want to fill the empty space with filler beads. i followed this tutorial to add some extra beading between sequins or outline other patches.
  13. continue with steps 4-12 until you've added each patch to the entire embellishment. notice that the smaller sequin clusters do not have any tule layers beneath them. here you will simply attach directly to the two a pieces of tule.
  14. once you finish the entire embellishment, it's time for the fun part. go ahead & put on the tee. you'll want to line up the full piece to make sure you like the placement. attach the embellishment to the tee with straight pins.
  15. hand stitch the embellishment, coming up from underneath & trying to stay underneath each sequin patch (but above the tule). this provides a strong attachment without visible thread.


click here for a picture led tutorial
& full size pattern. this project ended up taking a couple of 2 hour sessions, the beginning was especially slow. hopefully this pattern & tutorial will make things a little quicker for you. i'm really happy with how it turned out & am tempted to make a couple more in different colors.

please feel free to email me or leave comments with any questions or suggestions you might have on this tutorial, i always love to hear from you.

9.26.2009

recent sewing


i mentioned previously that i'd been trying to get a bit further into sewing - especially with my uncommitted fridays. in august, i had someone come in to walk me through sewing with a pattern. her name was kristen & i found her via craigslist; she lived in my neighborhood & only charges $100 for about 5 hours of assistance & tutoring. she forced me to take my time & pay attention to the details of the pattern, as well as explain parts/instructions i didn't understand. we made a pair of black flowy pants (aka new look 6896) & i can say i know how to add an invisible zipper, pleats, pockets, darts & a waistband to projects. i'm not sure this means i'll change my ways & only sew from patterns, but i'm sure i'll make a few more pairs with this pattern to get used to it before adding these things to my own projects.


the next project on my list (for weeks now) was to refashion a men's shirt. plaid seems to be all over this fall & i new it was time to get it done. this one was kind of a disaster, but i'm fairly happy with the results. i started to follow this tutorial, but couldn't handle the puckered sleeves. here's how i ended up handling it:
  1. detach sleeves using a seam ripper.
  2. use a shirt that fits you to lay over the men's shirt - use as a pattern & cut shirt appropriately.
  3. Sew the sides of the shirt until 6" from the bottom (if you choose to do a split on the sides).
  4. if straight along the base of the shirt cut into the edges to create rounded sides.
  5. iron hems along the sides & the bottom of the shirt, sew using a straight stitch.
  6. reinforce side seam where it splits.
  7. turn sleeves inside out & sew a seam creating a more fitted arm.
  8. pin right sides of each sleeve to the armhole in your shirt. mine happened to be the same circumference (dumb luck?!)
  9. using a straight stitch, attach sleeves to body.
  10. for a final touch, i added to 2.5" darts to the mid back for a better fit.
it all seemed sort of haphazard & i'd probably take a bit more time on the next one, but it's the perfect weekender shirt or might look cute tucked into a wool skirt.